When Failure Analysis is a Matter of Interpretation

Diverting bad boards from the field is often in the eye of the beholder.
Contrary to what you may think and, most unfortunately, Figure 1 is not a Goodyear Blimp-eyed view of a Hershey’s Chocolate Kiss or an Arabica coffee bean. Pity. Desire rudely thwarted, I was getting hungry.
With due respect to the health effects of excess chocolate consumption, Figure 1 exhibits a defect more pernicious in nature, with the potential for immediate and, potentially catastrophic, effect.
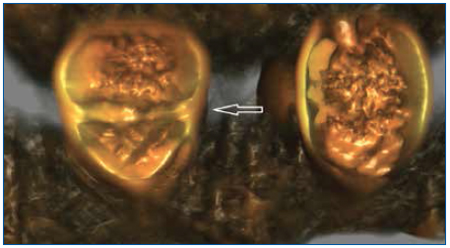
Figure 1. Head-in-pillow in a nondestructive 3D scan.
These are adjacent BGA balls, separated by 0.1mm, center-to-center. The image on the right is of a properly reflowed ball, whereas the image on the left exhibits classic symptoms of head-in-pillow (HiP) solder joint defects. For the uninitiated, HiP defects result from differential rates of reflow between the BGA ball and the substrate to which it is intended to be attached. Reflow differences result when a board, component or both warp during assembly, resulting in ball-to-solder paste separation during heating, and failure to form a properly coalesced solder joint during cooling. HiP can be exacerbated by the presence of oxides that accumulate during hold or dwell time between SMT process steps.
A HiP defect will likely not fail during in-circuit or functional test immediately following assembly. Such a defect is also nearly impossible to catch using automatic x-ray inspection (AXI) techniques. Those are pristine conditions. That’s the pernicious part. The defect often calls attention to itself in the field, under load, subject to mechanical stress or temperature excursions. Very inconvenient. Especially if it is airborne at that crucial moment. Or on a drilling platform in the Gulf of Mexico. Or in an operating room (during transplant surgery). Or in the midst of tapping foreign political leaders’ cellphones. Failure can spoil your whole day.
Product reliability and uptime is important. Understanding those occasions of failure and what initiates that mechanism is vital. Lessons learned can be swiftly applied.
Figure 2 shows another example of a hidden failure. What, at first glance, looks like overripe citrus fruit or a fisheye lens view of a pre-flash flood box canyon in New Mexico is in fact a microcrack. On one ball. Of one BGA. On a $35,000 printed circuit board. That doesn’t work. Cue consternation.
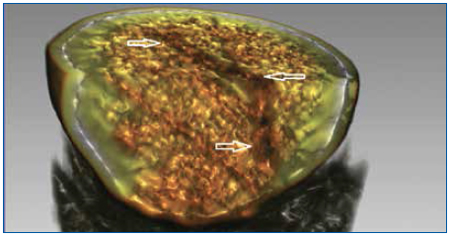
Figure 2. Confirming the extent of the crack using 3D nondestructive scan.
Finding this failure was the very last step, short of a destructive test. Once found, the bad BGA was removed and replaced, thus restoring an expensive board to service. Normalcy restored.
Once again, this board would have passed the requisite electrical tests in production. In a case of exquisitely bad timing (an understatement, trust me, because I can’t reveal more than that), it failed in the field, perhaps initially as an intermittent condition, then as a complete failure, potentially triggering an entire system shutdown. Undesirable outcomes in all instances (another understatement).
As testing and inspection folks, we look at images like those above daily. We get paid to interpret them. We know by training and experience what we are looking at, and the defects that we see are usually decisive, occasionally catastrophic in nature. They are emphatically not chocolate kisses or citrus fruit. What we have also learned, by painful experience, is that customers don’t always see the same thing we see. The crack in Figure 2 is fairly obvious and easy to explain. The HiP defect in Figure 1 is more mystifying to the first-time viewer, but, again, we try to educate the customer with literature and careful explanations. Some comprehend faster than others. Kind of like elementary school. Remember contractions in English grammar the first time you learned them? It’s like that. Not always obvious at first exposure. Insight is a variable-speed game, depending on the recipient.
Then there are the hard cases. Consider Figure 3. Or Figure 4. Both exhibit incipient HiP defects. Admittedly subtle, but there nonetheless.
Regrettably the customer in this case didn’t see it that way. He had an agenda. And our images did not fit the parameters of his predetermined facts.
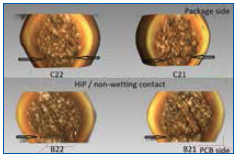
Figure 3. A HiP defect.
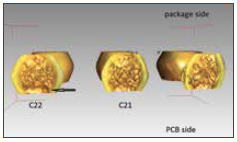
Figure 4. Like Figure 3, they often don’t show up until under extreme stress load.
What “facts” were these? In his experience with densely populated, high-layer count telecommunications or server boards, like this one, most board failures resulted from a failure at the chip (die level) or somewhere in the fab (bare board). Never before had he seen a HiP-related failure, and he was not in any receptive mood to admit one now. (So why come to us as a neutral failure analysis lab and spend your company’s money in the first place?) It would be charitable to say he was not open-minded. “Don’t confuse me with the facts” seemed his operating principle.
Certain agendas notwithstanding, we stuck to Joe Friday Mode (just the facts), and called ’em the way we saw them. Sent him a bill, too. Guess we just produced the wrong facts. He hasn’t called back.
Another time, with another customer, we produced the image in Figure 5. In this instance, the customer had no clue what he was looking at; although, he did sheepishly admit that it looked kind of pretty. So we got to play the role of radiologist. You know, the paternalistic type who will explain the x-ray slides of your hidden tumor if they must, but prefers to lurk in the background and let the techs do the hard work while they do the interpretation and get the credit. Very little uncomfortable personal interaction that way. However, as a patient you have incontrovertible proof the radiologist exists, coming as it does in the form of a large, dismaying bill.
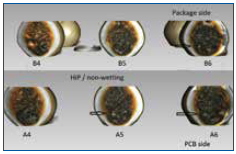
Figure 5. A HiP defect (nonwetting).
By contrast, we try to be benevolent radiologists, meeting in person and doing a lot of explaining and drawing of analogies. No, the images in Figure 5 are not Cajun-barbecued pomegranates; rather, they are the beginnings of failure. It will only get worse. The arrows tell the story. If they still don’t get it, we take them back to high school biology class and remind them what cell division looks like. The “aha!” moment usually comes when we describe the process when the nucleus first begins to split in two, and chromosomes and surrounding matter begin to assume opposing positions prior to physical division. That is a HiP defect, explained courtesy of protoplasm. It is not a good thing.
At about that point, the customer usually attains enlightenment and gets it. And out goes yet another bill.
Lest you think this is a tale of endless woe, let me end on an encouraging note. When a customer pays us to create these images, they usually are at their wit’s end, and we represent the cliff or salvation; the last real stop before destructively testing (cross-sectioning) a board is necessary to determine what is wrong with it. If it is an expensive board, that is an option they’d obviously rather not exercise. Further, if we can find what is wrong, and if it is a process-related workmanship defect, chances are good it can be fixed and the board saved.
Finally, what we find is often a process indicator, to use IPC-speak. The root cause this analysis reveals often affects downstream production because adjustments result from the images. So the customer’s initial disappointment at confirming a problem is tempered by the knowledge that what is found can be applied beneficially to subsequent lots. Clarity does that. It’s all in how you interpret the images.
Bet you never look at Hershey Kisses the same way again.
Robert Boguski is president of Datest Corp., (datest.com); rboguski@datest.com. His column runs bimonthly.


