Wishful Thinking in 5 Dimensions

On closer inspection, some equipment isn’t all it’s cracked up to be.
“Knowledge is power.” – Francis Bacon, Meditationes Sacrae
“Ignorance is bliss.” – George Orwell, 1984
“Can you explain to me the differences between 2D x-ray, 3D x-ray and 5D x-ray?”
I get this question a lot. It usually comes from a salesperson, although interestingly, not always.
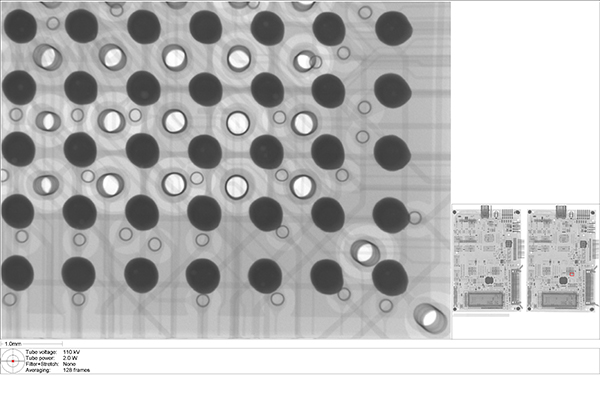
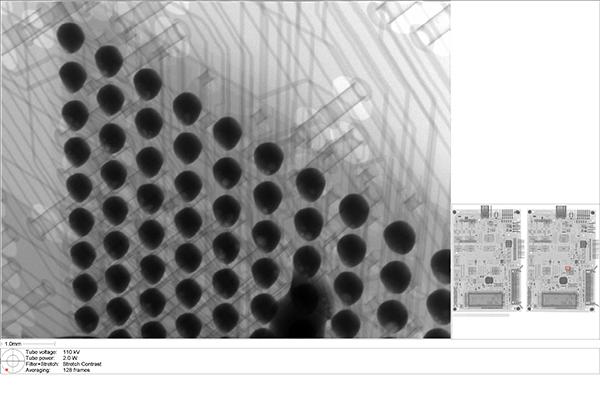
As the rest of us know, 2D describes those x-ray images taken in two dimensions, usually demarcated in Cartesian coordinate terms of X and Y, and displayed on a flat panel or a flat image viewer. Typical 2D images look like this:

Or this:

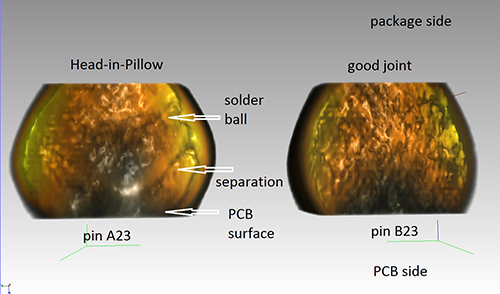
3D is shorthand for x-ray or CT-scan images that capture the full visual range of an object of interest, usually expressed in three-dimensional coordinate terms of X, Y and Z. A typical 3D CT-scan image looks like this:

We use both 2D and 3D imagery to find assembly defects. 2D is faster and, therefore, the first tool usually used in x-ray failure analysis. If you can find your problem in 2D in mere minutes, you often are well on your way to solving serious process issues. Were it so straightforward all the time.
Many pernicious solder joint defects elude 2D x-ray inspection. The troubleshooter must rely on 3D. The drawback is that 3D is slower, requires programming and typically demands virtual slicing of the object through software, followed by reconstruction in another set of viewing software, often on a dedicated workstation. It also demands great computer processing power and time. More time if one does not capture the defect on the first – or even second – attempts. For this reason, it is slower to attain the objective and, therefore, more expensive to use. However, 3D is often the only means of locating classic defects like head-in-pillow, insufficient solder and partially reflowed pads. 3D CT-scan technology also is very effective at finding micro-cracks. Once found by this method, the end-result often is a visually stunning, structurally compelling image that is often decisive in ending disputes between CMs and OEMs.
The differences between 2D (two dimensions) and 3D (three dimensions) are pretty obvious, aren’t they?
So what the heck is 5D?
That question is usually asked of me in semi-reverent tones. Like I’m a member of a secret priesthood, guardian of mind-bending knowledge beyond Euclidean space. My questioner’s reverence often carries hints that he/she wants to join the club, so they can be cool too.
Cue the buzzer.
It is a trade name.
I repeat: 5D is a trade name.
Thud.
This will crush some, for 5D emphatically does not refer to five dimensions. On or off drugs. Sorry to be the bearer of bad news, but sympathy and trust may not be as abounding as previously thought, and that new dawn of the Age of Aquarius may be more distant than heretofore hoped. Shame on those who purport to derive meaning or direction in their lives from the movements of celestial bodies. The meaning it points to is shortcomings in one’s education, upbringing or both. That is your horoscope for today.
Bummer.
The moniker “5DX” was concocted 20 years ago by corporate marketing types at Hewlett-Packard (the precursor to Agilent, still later Keysight). It had a circuitous pedigree. Before it was a 5DX, it was a 3DX (as in 3-dimensional x-ray), so called by the original designers, a small company of San Diego innovators in assembly inspection called Four Pi Systems. 3DX was not a happy machine. It was down more often than it was up. It developed such a notorious reputation for field failures and other reliability problems that system sales eventually fell to zero. Even in Japan, where customers initially were swayed by the argument that something this expensive ($1 million a pop!) must be something special. Oddly enough there were no repeat sales in Japan.
Hard to stay in business with zero sales. Four Pi was in deep trouble. In 1993, on the verge of bankruptcy, the inventor of automatic x-ray inspection systems was purchased by HP, which promptly was faced with a problem: what to do with a dog of a product.
Starting in 1993 and continuing for several years, HP insisted that its investment in Four Pi be spent to develop the next-generation x-ray inspection system. And so it came to be, after much effort and lengthy gestation, the new baby was birthed. But when the time came to roll it out of the barn, two questions arose: what to call the object being rolled out, and how to differentiate it from its ill-fated predecessor.
Logically, 4DX seemed to be the appropriate name for the new system. But superstition trumps logic. And some Asians can be really superstitious. Some even influence purchasing decisions on large pieces of capital equipment, such as robotic x-ray inspection systems. Doubly unfortunate is that the number four is considered unlucky in Asia. HP wanted their Asian customers to be lucky, or at least forthcoming with purchase orders.
4DX out. 5DX in.
Name inflation.
At the same time, it was decided by people at HP who decide such things that a new industry classification of product line needed to be created, to change attitudes and put some distance between the bad old and the good new. The new terminology had to be catchy, and memorable, like the acronym AOI, and relate to current equipment, but be different enough to signal a new generation of technology. And so was begat from on high the term AXI, for automatic x-ray inspection. Same as AOI, except that it’s really different.
A whole new industry was born. Process engineers worldwide were suddenly confronted with new means of torment. The machine was so precise it rejected almost everything. Everything can be overwhelming at times, especially to those on deadlines. And the opinion rose in certain quarters that AXI was more an impediment to shipping than a process management tool.
I will never forget the first time we ran a certain customer’s boards through AXI. The first board had 973 defects. When we pointed this out, unedited (rookie mistake), we had to endure a 10-minute, expletive-laden tirade from the responsible program manager, lambasting us as the proximate cause for why he was not able to ship on time (as if we soldered his boards). His beautifully tuned assembly process, reduced to ashes by the unfeeling summary judgment of a robot.
Others had a hard time grasping the concept that the technology was designed to look at every solder joint on the board, without exception.
I recall the time when a customer brought me a single board and asked if we could run it through AXI, but only look at the BGA and ignore the rest. Yes we could, we told him, but he would be paying for an inspection program for the entire board, because that’s what the inspection system did. He was crestfallen. Hard to amortize that startup cost over a single-board test run. No money in the budget for that. No time either.
Others failed to understand the limits in those days of 3D imaging, and the outputs the system could produce.
I also recall the time when a customer thought she could import AXI output data files to 3D rendering software and put on her 3D glasses to view and manipulate them on a workstation viewer to her heart’s content. No go. She didn’t know that the output files are jpegs: flat files.
Or the AXI programmer job interviewee who lamented to me that his management would regularly overrule the results of his AXI inspection and ship the defective product anyway. In despair he finally told his boss to lay him off because his contributions toward process improvement were routinely ignored.
Or the AXI system that sits on the factory floor, collecting dust. Its only purpose is to be present for the qualification visit, enabling that box to be ticked off the checklist. The EMS has no intention of operating it, but knows enough to know how the game is played.
Stories like these could fill multiple thick volumes of a 20-year chronicle of misunderstandings and misapplications of a brilliantly conceived technology. It makes you wonder who was manipulating whom?
What’s in a name?
is president of Datest Corp., (datest.com); rboguski@datest.com. His column runs bimonthly.


