Current Issue
Ensuring Charge Measurement Application Accuracy
How to configure systems and account for error sources.
Electrostatic discharge or a release of static charge can damage sensitive electronic components, resulting in failures, reduced reliability and increased rework costs, or latent component failures in equipment in the field. That potential for damage makes the ability to characterize charge accurately extremely important for electronics manufacturers.
Charge, as we all learned in introductory physics, is the time integral of current.  Eq. 1
Eq. 1
Charge is often measured on a quantity of particles, on a surface, or on a component such as a capacitor. Sometimes, charge is measured on a continuous basis, such as when using the coulombmeter to measure very low current. An electrometer makes an ideal coulombmeter because it has very low input offset current and high input resistance. The coulombmeter function of the electrometer measures charge by integrating the input current. An integrating capacitor is used in the feedback loop of the input stage (Figure 1).
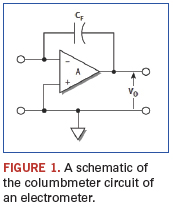
Electrometers are ideal for charge measurements, because their low offset current won’t alter the transferred charge during short time intervals, and their high input resistance won’t allow the charge to bleed away. Electrometers use a feedback circuit to measure charge, as shown here. The input capacitance of this configuration is ACF. Therefore, large effective values of input capacitance can be obtained using reasonably sized capacitors for CF.
As accurate as electrometers are, a variety of error sources can degrade charge measurement integrity if not taken into account. These error sources include input offset current, voltage burden, generated currents, and low source impedance.
Input offset current. Input offset currents are background currents that are present in the measuring instrument when no signal current is applied to the instrument. With an electrometer, the input offset current is very low. However, at low charge levels, even this small current may be a significant error factor. Over long periods, the instrument will integrate the offset current, which will be seen as a long-term drift in the charge measurement. Typical offset current is four femto-amps, which will cause a change in the charge measurement of four femto-coulombs per second. If the offset current is known, it’s possible to compensate for this error simply by subtracting the charge drift due to offset current from the actual reading. However, determining the offset current of the entire system is likely to be significantly more complicated.
Voltage burden. The voltage burden of an ammeter is the voltage drop across the input terminals. The voltage burden of a feedback coulombmeter is generally quite low (less than 100 microvolts). However, if the instantaneous peak current is more than 10 micro-amps, the voltage burden can exceed this level momentarily. In an overload condition, the voltage burden can reach many volts, depending on the input value. If the source voltage is at least 10 mV, the typical electrometer in the coulombs mode will integrate the current accurately. However, if the source voltage is much lower, the voltage burden may become a problem, and the input stage noise will be amplified so much that making accurate measurements is impossible.
Generated currents. Generated currents from the input cable or induced currents due to insufficient shielding can cause errors in charge measurements, especially with charge levels of 100 pC or less. To minimize generated currents, always use low noise cable and electrostatically shield all connections and the DUT.
Source impedance. The magnitude of the source impedance can affect the noise performance of the feedback coulombmeter. Figure 2 illustrates a generalized feedback circuit connected to a source impedance. In a coulombmeter, the feedback impedance is a capacitor. The noise gain of the coulombmeter can be calculated from this equation:
Output noise = Input noise × (1 + ZF/ZS) Eq. 2
where: ZS is the source impedance
ZF is the feedback impedance of the coulombmeter
Input noise is the noise of the input stage of the electrometer
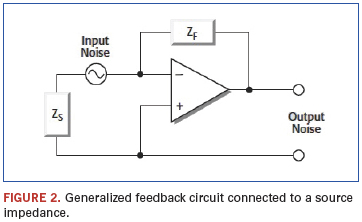
In general, as ZF becomes larger, the noise gain increases. The documentation or specifications for the particular electrometer being used will generally provide the value of its feedback impedance.
Other Charge Measurement Considerations
Unlike a voltage measurement, a charge measurement is a destructive process. That is, the process of making the measurement may remove the charge stored in the device under test. When measuring the charge on a device such as a capacitor, it’s important to disable the zero check of the electrometer first, and then connect the capacitor to the high impedance input terminal. Zero check is a process where the input amplifier of the electrometer is reconfigured to shunt the input signal to low. Otherwise, some of the charge will be lost through the zero check impedance and won’t be measured by the electrometer. That’s because when zero check is enabled, the input resistance of the electrometer is about 10 MΩ. Opening the zero check switch produces a sudden change in charge reading known as “zero hop.” To eliminate the effects of zero hop, take a reading just after the zero check is disabled, then subtract this value from all subsequent readings. An easy way to do this is to enable the REL function after zero check is disabled, which nulls out the charge reading caused by the hop.
The charge measurement range of most electrometers can be extended through the use of the external feedback mode, which allows use of an external device as the electrometer’s feedback element. Placing the electrometer in the volts mode and then enabling external feedback switches the feedback circuit from an internal network to a feedback circuit connected to the preamp output.
To extend the coulombs ranges, an external capacitor is used as the feedback element. An external feedback capacitor is placed between the preamp output terminal and the HI input terminal of the electrometer (Figure 3). To prevent electrostatic interference, the capacitor is placed in a shielded test fixture.
When in external feedback mode, the electrometer will display the voltage across the feedback element. The unknown charge can be calculated from the following formula:
Q = CV Eq. 3
where: Q = charge (coulombs)
C = capacitance of the external feedback capacitor (F)
V = voltage on display of electrometer (V)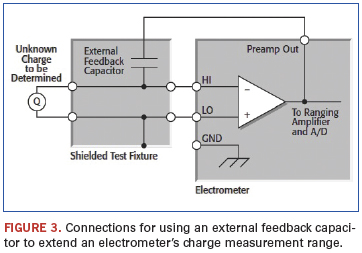
For example, using an external feedback capacitor of 10 mF and measuring 5V on the display of the electrometer, the calculated charge is 50 µC. The capacitance of the feedback element should be at least 10 pF to avoid errors due to stray capacitance and noise gain. To ensure low leakage current and low dielectric absorption, the feedback capacitor should be made of a suitable dielectric material such as polystyrene, polypropylene, or Teflon.
Several other elements of measurement “hygiene” are critical to making good charge measurements with electrometers, including making proper connections, minimizing electrostatic interference, and minimizing the impact of environmental factors.
Making connections. To avoid measurement errors, it’s critical to make proper connections from the electrometer to the device under test. Always connect the high-resistance terminal of the meter to the highest resistance point of the circuit under test.
Electrostatic interference and shielding. Electrostatic coupling or interference occurs when an electrically charged object approaches the input circuit under test. At low impedance levels, the effects of the interference aren’t noticeable because the charge dissipates rapidly. However, high-resistance materials don’t allow the charge to decay quickly, which may result in unstable measurements. The erroneous readings may be due to either DC or AC electrostatic fields, so electrostatic shielding will help minimize the effects of these fields.
DC fields can produce noisy readings or undetected errors. These fields can be detected when movement near a test setup (such as the movement of the person operating the instrument or others in the immediate vicinity) causes fluctuations on the electrometer’s display. To perform a quick check for interference, place a piece of charged plastic, such as a comb, near the circuit. A large change in the meter reading indicates insufficient shielding.
AC fields can be equally troublesome. These are caused most often by power lines and RF fields. If the AC voltage at the input is large, part of this signal is rectified, producing an error in the DC signal being measured. This can be checked by observing the analog output of the electrometer with an oscilloscope. A clipped waveform indicates a need to improve electrostatic shielding.
AC electrostatic coupling occurs when an electrostatic voltage source in the vicinity of a conductor, such as a cable or trace on a printed circuit board, generates a current proportional to the rate of change of the voltage and of the coupling capacitance. This current can be calculated with the following equation:
i = C dV/dt + V dC/dt Eq. 4
For example, two conductors, each with 1cm2 area and spaced 1cm apart by air, will have almost 0.1 pF of capacitance. With a voltage difference of 100V between the two conductors and a vibration causing a change of capacitance of 0.01 pF/sec. (a 10% fluctuation between them), a current of 1pA AC will be generated.
To reduce the effects of the fields, a shield can be built to enclose the circuit being measured. The easiest type of shield to make is a simple metal box or meshed screen that encloses the test circuit. Shielded boxes are also available commercially. Made from a conductive material, the shield is always connected to the low impedance input of the electrometer.
The cabling between the HI terminal of the meter and the device under test also requires shielding. Capacitive coupling between an electrostatic noise source and the signal conductors or cables can be greatly reduced by surrounding those conductors with a metal shield connected to LO. With this shield in place, the noise current generated by the electrostatic voltage source and the coupling capacitance flows through the shield to ground rather than through the signal conductors.
To summarize, follow these guidelines to minimize error currents due to electrostatic coupling:
- Keep all charged objects (including people) and conductors away from sensitive areas of the test circuit.
- Avoid movement and vibration near the test area.
- When measuring currents of less than 1 nano-amp, shield the device under test by surrounding it with a metal enclosure and connect the enclosure electrically to the test circuit common terminal.
Although the word “shielding” usually implies the use of a metallic enclosure to prevent electrostatic interference from affecting a high impedance circuit, guarding implies the use of an added low impedance conductor, maintained at the same potential as the high impedance circuit, which will intercept any interfering voltage or current. A guard doesn’t necessarily provide shielding.
Environmental factors. A stable test environment is essential for making accurate low level measurements of all types.
Temperature and temperature stability. Varying temperatures can affect low level measurements in several ways, including causing thermal expansion or contraction of insulators and producing noise currents. Also, a temperature rise can cause an increase in the input bias current of the meter. As a general rule, JFET gate leakage current doubles for every 10°C increase in temperature, but most electrometers are temperature compensated to minimize input current variations over a wide temperature range. To minimize errors due to temperature variations, operate the entire charge measurement system in a thermally stable environment. Keep sensitive instruments away from hot locations (such as the top of a rack) and allow the complete system to achieve thermal stability before making measurements. Use the instrument’s zero or suppress feature to null offsets once the system has achieved thermal stability. Repeat the zeroing process whenever the ambient temperature changes. To ensure optimum accuracy, zero the instrument on the same range as that used for the measurement.
Humidity. Excess humidity can reduce insulation resistance on PC boards and in test connection insulators. A reduction in insulation resistance can, of course, have a serious effect on high impedance measurements. In addition, humidity or moisture can combine with any contaminants present to create electrochemical effects that can produce offset currents.
To minimize effects of moisture, reduce humidity in the environment (ideally <50%). Ensure all components and connectors in the test system are clean and free of contamination. When cleaning, use only pure solvents to dissolve oils and other contaminants; then rinse the cleaned area with fresh methanol or deionized water. Allow cleaned areas to dry for several hours before use.
Ionization interference. Current measurements made at very low levels (<100fA) may be affected by ionization interference from sources such as alpha particles. A single alpha particle generates a track from 30,000 to 70,000 positive and negative ions per cm, which may be polarized and moved about by ambient electric fields. Also, ions that strike a current-sensing node may generate a “charge hop” of about 10 fC per ion. There are several ways to minimize test system noise due to ionization interference. First, minimize the volume of air inside the shield around sensitive input nodes. Also, keep sensitive nodes away from high-intensity electric fields.
RFI. Interference from radio frequency sources can affect any sensitive electrometer measurement. This type of interference may be indicated by a sudden change in the reading for no apparent reason. A nonlinear device or junction in the input circuit can rectify the RF energy and cause significant errors. Sources of such RFI are nearby transmitters, contactors, solenoid valves, and even cellular telephones and portable two-way radios. Once the source is identified, the RF energy may be reduced or eliminated by shielding and adding snubber networks or filters at appropriate points.
Common Charge Measurement Applications
Charge measurements include applications such as measuring capacitance and static charge on objects. Charge measurement techniques can also be used to measure very low currents (less than 10 femto-amps, or fA).
The coulombs function of an electrometer can be used with a step voltage source to measure capacitance. This technique is especially useful for testing cables and connectors because it can measure capacitances ranging from <10pF to hundreds of nanofarads, or nF. The unknown capacitance is connected in a series with the electrometer input and the step voltage source. The calculation of the capacitance is based on this equation:![]() Eq. 5
Eq. 5
Figure 4 illustrates the basic configuration for measuring capacitance with an electrometer with a built-in voltage source. The instrument is used in the charge (or coulombs) mode, and its internal voltage source provides the step voltage. Just before the voltage source is turned on, the meter’s zero check should be disabled and the charge reading suppressed by using the REL function to zero the display. Then, the voltage source is turned on and the charge reading noted immediately. The capacitance is calculated from:![]() Eq. 6
Eq. 6
where: Q2 = final charge
Q1 = initial charge assumed to be zero
V2 = step voltage
V1 = initial voltage assumed to be zero
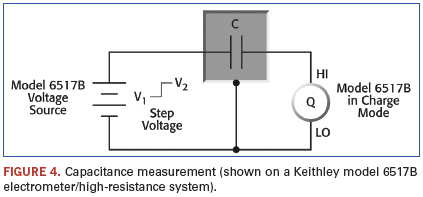
After the reading has been recorded, reset the voltage source to 0V to dissipate the charge from the device. Before handling the device, verify the capacitance has been discharged to a safe level. The unknown capacitance should be in a shielded test fixture. The shield is connected to the LO input terminal of the electrometer. The HI input terminal should be connected to the highest impedance terminal of the unknown capacitance. For example, when measuring capacitance of a length of coaxial cable, connect the HI terminal of the electrometer to the center conductor of the cable, allowing the cable shield to minimize electrostatic interference to the measurement.
If the rate of charge is too great, the resulting measurement will be in error because the input stage becomes temporarily saturated. To limit the rate of charge transfer at the input of the electrometer, add a resistor in a series between the voltage source and the capacitance. This is especially true for capacitance values greater than 1 nF. A typical series resistor would be 10 kΩ to 1 MΩ.
As mentioned, a Faraday cup is useful for measuring static charge on objects. This is useful because insulators permit only a slight motion of electrons, which allows electrostatic charges to build up on a material and create hazards. The problem generally is not the static charge itself on the object, but rather the spark generated when the object discharges. Therefore, in order to understand and control these problems, it’s necessary to measure the static electricity on an object. This can be done by placing the object in a Faraday cup and measuring the charge with an electrometer. The Faraday cup method can be used to measure the charge on a wide range of substances and objects, such as plastics, films, liquids, gases, and electronic components.
A Faraday cup (sometimes called a Faraday cage or icepail) is an enclosure made of sheet metal or conductive mesh (Figure 5). The electric field within a closed, empty conductor is zero, so the cup shields the object placed inside it from any atmospheric or stray electric fields. This enables the accurate measurement of the charge.
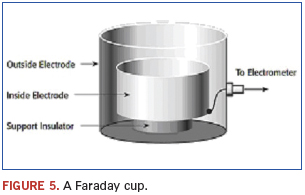
A Faraday cup consists of two electrodes, one inside the other, separated by an insulator. The inside electrode is connected to the electrometer HI, and the outside electrode is connected to the electrometer LO. When a charged object is placed within the inside electrode, an induced charge will flow into the electrometer.
A Faraday cup can have virtually any dimensions, depending on the size and shape of the object to be tested. Cylindrical and spherical shapes are typically the most convenient choices; simple containers such as coffee or paint cans are often used. The electrodes can be made of any conductive material. The support insulators should be made of materials with very high resistance, such as Teflon or ceramic. For convenience in making connections, mount a BNC connector on the outside electrode. Connect the outer or shield connection of the BNC connector to the outside electrode, then connect the inner conductor of the BNC connector to the inside electrode. Use an adapter to connect the BNC connector to the triax input of the electrometer.
To measure the static charge on an object, connect an electrometer to the Faraday cup using a shielded cable. Turn on the electrometer, select the coulombs function, then disable “Zero Check” and press “Rel” to zero the display. Drop the charged object to be tested into the Faraday cup. Note the charge reading on the electrometer immediately; don’t wait for the reading to settle because the input offset current of the electrometer will continue charging the input of the meter. This is particularly important when the unknown charge is at the pico-coulomb level. If the object is conductive, it will be discharged as soon as it touches the electrode. Enable “Zero Check” to re-zero the meter in preparation for the next measurement.
Ensuring the accuracy of charge measurements requires careful attention to creating appropriate system configurations and accounting for error sources. With the right instrumentation and a good understanding of the principles involved, electronics engineers can obtain high integrity measurements consistently.
Jonathan L. Tucker is senior marketer, Scientific Research Instruments and Research and Education, at Keithley Instruments (keithley.com); jtucker@keithley.com.
Press Releases
- Altus Group Expands Aftersales Team to Its Largest Size to Date
- Incap Estonia Invests in New Flying robe System to Advance Production Performance
- Critical Manufacturing Partners with Canonical to Expand Cloud-Native Deployment Options for Manufacturers
- Heller Industries Becomes the Latest Partner to Join THE SMT FUTURE EXPERIENCE


