What Solder Ball Size Variation Can Tell Us

Measuring BGA joints can reveal process problems.
This month we show variation in the size of the solder joints on a section of a BGA. Measuring variation on solder ball size after reflow is useful. Even better is when measurements are taken automatically with an x-ray system, as this provides a good comparison tool between NPI and production builds.
Measuring NPI build, and saving the measurement data, provides a good point of reference when problems are seen on a build. It is also useful when moving between contractors or in the event of changes due to other process modifications.
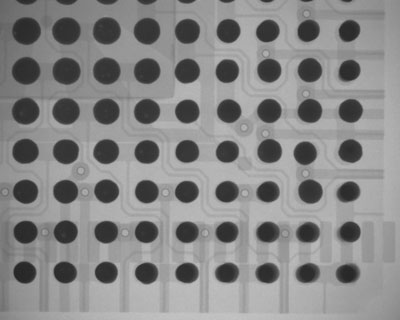
FIGURE 1 is an x-ray image of the corner of a soldered BGA. There is variation in joint size from the device edge to the package center. Variation in ball size most likely indicates warping of the device in the center of the package or at the edges.

Figure 1. This x-ray of the corner of a soldered BGA indicates possible device warping.
We have presented live process defect clinics at exhibitions all over the world. Many of our Defect of the Month videos are available online at youtube.com/user/mrbobwillis.
is a process engineering consultant; bob@bobwillis.co.uk. His column appears monthly.
Press Releases
- Aven Welcomes Max Ramos to Strengthen Distribution Partner Operations
- ubersmt Expands SMT Line with Juki G-Titan Printer and RS-1R Placement System
- Keiron Technologies to Host LiFT Webinar Focusing on Solving Solder Paste Printing Challenges
- Express Manufacturing, Inc. Strengthens Test Capability with Acculogic Flying Probe System


