MIRTEC to Exhibit its Complete Line of AI-Based SMT and Automotive Pin Inspection Solutions at Productronica 2021
November 2021 – MIRTEC, “The Global Leader in Inspection Technology” will showcase its cutting-edge INTELLI-PRO AI Based Smart Factory Automation Solution and GENSYS-PIN Automotive Pin Inspection System in booth #461, Hall A2 at the 2021 Productronica exhibition. The world’s largest exhibition for the electronic manufacturing industry will take place on Nov. 16-19, 2021, at Messe Munich exhibition hall in Germany.
“It’s been a while since the industry started to integrate Artificial Intelligence into their products to realize the Smart Factory.” stated Holger Hansmann, President of MIRTEC Germany. “As one of the pioneers for AI development in this field, MIRTEC recently released its comprehensive AI based Smart Factory Automation solution ‘INTELLI-PRO’. This Technologically Advanced Software and Algorithm Package is specifically designed for the purpose of improving the performance and convenience of MIRTEC’s complete line of AOI machines. INTELLI-PRO consists of a proprietary Deep Learning based Automatic Part Search and Teaching function, and AI based; Automatic Parameter Optimization, Character Recognition (OCR), Foreign Object Detection (FOD), Placement Inspection Algorithms and an Automatic Defect Type Classification function.
INTELLI-PRO Yields AI Based Inspection Process Perfection
INTELLI-PRO has three stages in the inspection process: preparation stage, inspection stage, and post-inspection stage.
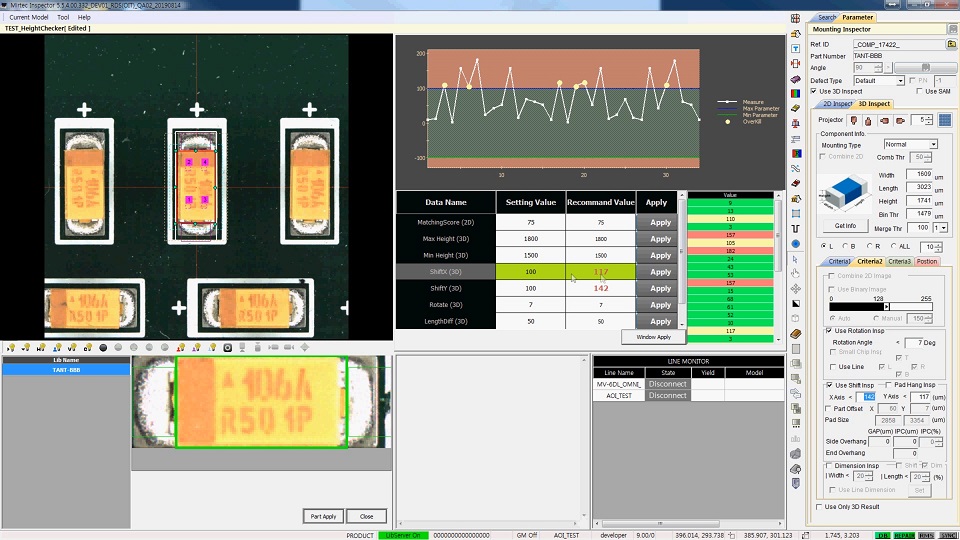
At the preparation stage, teaching and debugging are required to run an AOI machine. MIRTEC’s Deep Learning Auto Matching & Teaching Tool searches for proper part type, size, and other information on the PCB from a parts library. It then automatically places inspection windows on parts with pre-programmed inspection algorithms and parameters. The user can debug / optimize the teaching model produced from the preparation stage with Optimum Inspection Tool (OIT). The user can simply run the inspection on the PCB and review the results to determine if a part is good or defective. The AI applied software will suggest optimal parameter values. From MIRTEC’s research, it takes approximately ten PCBs to get the optimized result under general conditions. These two software solutions help to reduce teaching time by about 90% compared to manual teaching, and 50% compared to auto teaching tool without Deep Learning. OIT is easy to use and highly accurate, so even a new operator can easily create the optimal inspection recipes.
At the inspection stage, MIRTEC’s Deep Learning Optical Character Recognition (OCR), Foreign Object Detection (FOD), and Placement Inspection algorithms will enhance inspection quality and effectiveness. Generally, OCR and FOD algorithms are frequently affected by false calls. If it is possible to reduce the false call rates on these items, it will greatly reduce the overall false call rate during the inspection process. MIRTEC has invested much into applying Deep Learning to its OCR algorithm. Deep Learning based applications excel with the availability of more data. MIRTEC has accumulated character images and inspection data for Deep Learning during its extensive business and research tenure. MIRTEC’s character recognition rate is one of the highest amongst AOI makers. MIRTEC’s FOD solution increases detection rate by analyzing image data. The user can teach what a foreign object looks like on an image allowing the machine to learn to identify foreign objects. MIRTEC’s placement algorithm also follows a similar process. The user can classify the image as ‘good’ or ‘defect’; the machine will learn thus improving the detection rate.
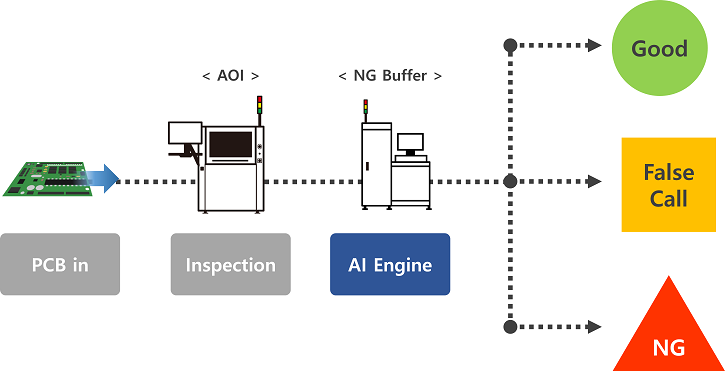
The post-inspection stage is a process in which inspection results are reviewed and classified. When the AOI finds a defect, the PCB will be sent to an NG buffer. Upon review, an operator will be able to judge if the defect is real or a false call. MIRTEC’s Deep Learning Auto Defect Classification Tool can change that. This software will ‘suggest’ to the user whether the defect on a NG PCB is a real defect or a false call. However, as the software accumulates inspection data, the software will learn to identify real versus false calls. The predictions will become more accurate over time. Eventually, after approximately six months of learning, the software can then ‘judge’ the defect rather than ‘suggest’ to the user.
Complete Line-up of Advanced Inspection Systems
MIRTEC’s MV-6 OMNI 3D AOI Machine is configured with our exclusive OMNI-VISION® 3D Inspection Technology which combines 15 or 25 Mega Pixel CoaXPress Camera Technology with MIRTEC’s revolutionary Digital Tri-Frequency Moiré 3D system in a cost-effective platform. MIRTEC’s CoaXPress Vision System is a proprietary camera system designed and manufactured by MIRTEC for use with our complete product range of 3D inspection systems. MIRTEC’s Twelve (12) projection Digital Tri-Frequency Moiré Technology provides true 3D inspection to yield precise height measurement data used to detect lifted component and lifted lead defects as well as solder volume post reflow. Fully configured the MIRTEC MV-6 OMNI machines feature four (4) 10 or 18 Mega Pixel Side-View Cameras in addition to the Ultra-High Resolution CoaXPress Top-Down Camera. There is little doubt that this new technology has set the standard by which all other inspection equipment is measured.
MIRTEC’s MV-3 OMNI Desktop 3D AOI Machine is configured with the same hardware and software as MIRTEC’s in-line OMNI-VISION® 3D Inspection Systems providing 100% compatibility across MIRTEC’s entire 3D AOI product line. These systems feature our exclusive OMNI-VISION® 3D Inspection Technology which combines 15 or 25 Mega Pixel CoaXPress Camera Technology with MIRTEC’s revolutionary Digital Tri-Frequency Moiré 3D system in a cost-effective platform. MIRTEC’s CoaXPress Vision System is a proprietary camera system designed and manufactured by MIRTEC for use with our complete product range of 3D inspection systems. MIRTEC’s Twelve (12) projection Digital Tri-Frequency Moiré Technology provides true 3D inspection to yield precise height measurement data used to detect lifted component and lifted lead defects as well as solder volume post reflow. Fully configured the MIRTEC’s MV-3 OMNI machines feature four (4) 10 or 18 Mega Pixel Side-View Cameras in addition to the Ultra-High Resolution CoaXPress Top-Down Camera. Without question, the MV-3 OMNI is the most Technologically Advanced Desktop 3D AOI machine in the world!
MIRTEC’s Award-Winning MS-11e 3D SPI Machine is configured with an exclusive 15 Mega Pixel CoaXPress Camera System and RGB Color Light, providing enhanced image quality, superior accuracy, and incredibly fast inspection rates. The Shadow-Free Dual Projection Phase Shift Profilometry Technology eliminates the shadow effect produced from the angle of moiré projections in order to ensure stable 3D measurement. The combination of a Telecentric Compound Lens applied with top-down camera and long working distance using mirror projection makes it possible to detect 3um height bridge defects between solder paste which qualifies for inspection of solder paste applied to mini-LED PCB.
MIRTEC will display an extraordinary inspection system at Productronica 2021. It’s called GENESYS-PIN, a Pin Inspection System for Automotive Electronics Products. It is configured with a 12 Mega Pixel CoaXPress High-speed Camera System with 15um Lens, Nine (9) Phase RGB Color Lighting System, long stroke Z-Axis, and four (4) of Programmable Multi-pattern Digital Projectors that is used for Hybrid 3D Measurement Technology. With this revolutionary optical system, the GENESYS-PIN machine can measure 50mm height connector pin, single pin, pin array, press-fit pin, and fork pin while maintaining high accuracy. Plus, it finds types of defects such as missing, offset (bent/tilt), distance between pins and inner/outer diameter of fork pin. The GENESYS-PIN machine operates in two different modes. One for precision inspection and the other one is for fast inspection. From zero to 12mm there’s no difference between two operation modes. In Precision Mode, when the pin height exceeds 12mm, the Z-axis attached to optical head rises the head, so that it can measure pins with precise accuracy up to 50mm. On the other hand, in High-Speed Mode, the Z-Axis never moves, and height measurement is limited up to 40mm, but the inspection speed is increased approximately 53% compared to the Precision Mode. It’s less accurate compared with Precision Mode, yet it is more precise than normal 3D AOI machines.
Leading the Way to Industry 4.0
MIRTEC’s AOI and SPI machines are qualified with IPC-2591 CFX Standard. You can easily find model names on the IPC-CFX Qualified Product List (QPL) page. This means MIRTEC’s machines can communicate seamlessly with other IPC-CFX capable equipment in the manufacturing line. This shows that MIRTEC’s machine is one of the best options when it comes for you to realize Smart Factory.
If the other machines in the line do not support the IPC-CFX Standard, MIRTEC’s Total Remote Management System (TRMS) is able to support M2M connection between different kinds of machines. Also, as its name implies, the TRMS provides advanced remote management features such as real-time monitoring, data analysis, and remote-control for Windows OS-based system.
“MIRTEC has stepped up to the challenge of Smart Factory Automation” continued Hansmann. “MIRTEC’s INTELLI-PRO AI Based Smart Factory Automation Software and M2M connectivity solutions were specifically developed for that reason. I’m certain that MIRTEC’s revolutionary inspection systems and software solutions will provide notable benefits to those Electronic Manufacturers looking for superior 3D inspection performance, low cost of ownership and user-friendly software interface. We look forward to welcoming visitors to our booth A2-461 during the four-day event.”


