

How to Troubleshoot an Amber Printing Process

The top eight fixes in the fishbone diagram to get back in spec.
The last column focused on making a “green light” stencil printing process more efficient, but for a not-so-green – maybe a bit more amber – print operation, some tried-and-true troubleshooting methodologies can get high-yield boards moving again. As I’ve noted before, myriad stencil printing inputs can affect outcomes. The famous fishbone diagram, noted in FIGURE 1, can seem daunting at first, but by taking a methodical approach to understanding the root cause of a problem, it’s relatively straightforward to get printing back in spec.
The first question to ask is, “Has the process ever been good?” This is especially important for a legacy product. If the answer is “yes,” then retracing steps using the fishbone diagram, along with some tacit knowledge, can point you toward what may have changed to move the results out of spec. Of course, this same checklist can work for a new product too. While many elements are in the fishbone diagram, the below represent my top eight most likely culprits and fixes:
Machine calibration. Check the date of the last machine calibration. In my experience, probably eight of 10 machines require calibration after they are released onto production floors. If the calibration is out of date, do it! And, if it has been calibrated, but you are seeing issues, check the onboard systems to ensure nothing has gone awry with the machine.
Product program. It’s not that uncommon to see the wrong program loaded for a specific product, especially if the fiducials and board size are the same (and that’s not the printer’s fault, really), though other requirements may be different. To ensure you have the proper recipe, check that the parameters match the instructions, such as those for speed and pressure.
Squeegees. The proper squeegee length and angle are critical. Unless you are a printing specialist, the angles can look very similar when loaded on the machine. If the program calls for a 60°, 200mm-long blade, make sure you’re not running a 45°, 300mm-long squeegee. This will result in a completely different process. In addition, check the condition of the squeegee to verify flatness and sharpness. The squeegee is doing all the work, so respect the squeegee.
Solder paste material. In the rare case a manufacturer uses only one solder paste vendor and one paste type/recipe variant, then half the battle is over because the correct material will always be on hand. This isn’t likely, however, especially in an EMS environment. Check the barcodes, confirm metal loading of the material, expiry date and that the paste has been stored properly.
Stencil quality. Stencil manufacturing is a variability. It’s a manual process; someone has to select the right Gerber and the correct stencil foil blank. When an issue arises in the process and other quality checks have been made, look at the stencil. Measure it, make sure the certificate aligns, and if you have measurement equipment onsite (highly recommended), take a couple of aperture x, y measurements.
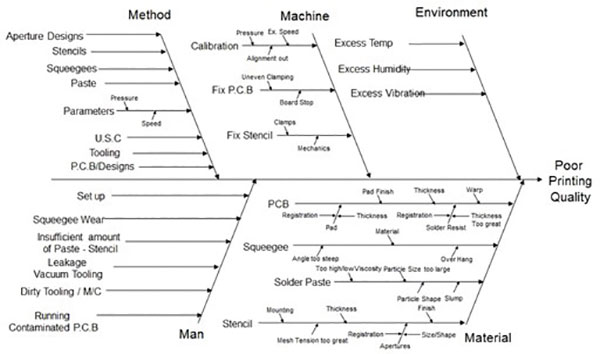
Figure 1. Fishbone diagram of factors that influence print quality.
Tooling. A lot of tooling blocks can accept different products but may not be optimized for all of them. Check the serial number and align with the product identification. Verify the block’s height, that it is clear of any debris, and if it’s a double-sided assembly, verify that a small component isn’t lodged in one of the cavities. With today’s dimensions, even microscopic obstacles can affect deposit precision.
Understencil cleaner. If the process is running fine and then suddenly there are issues like bridging, the understencil cleaner may be the culprit. Check to see if anything’s changed. Are you using different solvents? Different fabrics? Has the fabric been loaded properly for it to advance as needed? The cleaning is a process within a process. It must be optimized for the best results.
Printed circuit board (PCB)/substrate. Finally, my top-eight checklist includes the PCB/substrate. An assembly process engineer doesn’t have a lot of influence on board quality, but you can verify it. Measure, measure, measure. Confirm proper board dimensions (width, length and thickness), as this can affect everything from clamping to alignment (the biggie!). Even solder mask and nomenclature can affect gasketing if not even or in the right place (in the case of nomenclature).
A systematic approach to resolving the root cause of an out-of-spec printing issue usually does the trick. Change one thing at a time and slowly work through the list. In our data- and stats-driven world, multifaceted analysis is achieved in seconds. Things are a little different on the shop floor, though, where you don’t have the luxury of spending the day doing a controlled experiment. Going top down should lead you to the smoking gun and back to green lights. •
CLIVE ASHMORE is global applied process engineering manager at ASM Assembly Systems, Printing Solutions Division (asmpt.com); clive.ashmore@asmpt.com. His column appears bimonthly.


Press Releases
- Altus Adds LPKF CuttingMaster 3290 to Depaneling Portfolio
- Kurtz Ersa Partners with E-tronix for Sales in Illinois and Wisconsin
- XLR8 EMS Welcomes Raul Jorge Lopez Jr. as Director of Program Management and Procurement
- Koh Young America Promotes Ramiro Mora to Lead Service and Applications in Mexico and South America