Everyone Blames the BGA
 Simple process steps for inspecting arrays. (But don’t expect them to always be the source of failures.)
After more than 15 years working with people who choose to use x-ray inspection as part of their fault-finding and quality-ensuring procedures, the most common refrain I hear is, “The board’s not working; it must be the BGA.” I do also hear this from those who do not have access to x-ray!
Arguably, as the BGA was the first commonly used component to be placed on boards with all its interconnections hidden from any possibility of post-reflow optical inspection, I suggest the BGA has been the primary driver for the increased uptake of x-ray inspection in recent years. After all, x-ray inspection is nondestructive and can see where optical systems cannot. Perhaps it is the entirely optically hidden nature of the BGA joints that has caused its infamy within electronics manufacturing. By not being able to see the joints that have been made, how can the BGA be ruled out as the cause of the failing circuit? Without some certitude in this, how can a contract manufacturer assuage its client’s belief that all non-working products have been caused by poor reflow under the BGA, rather than by some other mechanism? X-ray inspection goes a long way to help both parties resolve this, and, assuming it isn’t actually the BGA’s fault, the “first likely cause of problem” can be ruled out, and all parties can move on quickly and productively to consider other potential reasons for the issue.
However, BGAs can be the problem. The presence of shorts and missing balls can be clearly seen in a top-down x-ray image. Open joints and head-in-pillow/head-on-pillow joints (both terms are in common usage) may be very difficult to see from top-down, owing to the bulk of the solder ball obscuring the joint interfaces. Therefore, taking x-ray images at oblique angles reveals a separation in the image of the ball-to-board and ball-to-device interfaces, where differences, especially when comparing the joint shapes to adjacent and other areas of the BGA, will help identify any problems. The “bad” reputation of the BGA may not be helped when, after looking at the joints from all angles, all the ball/joints look the same. Unless the BGA falls off the board under gravity when turned upside down (indicating all the joints had failed!), then consistency of results should suggest reflow has been successful. This could be confirmed more easily with the use of wetting indicators under the BGA, where the deliberate creation of a distinctive joint shape, post reflow, can quickly be seen. If only a few wetting indicators are used at the edge and the center of the device, however, in this situation the x-ray cannot give a 100% guarantee all is well. While the balance of probabilities suggests it is, my experience suggests that at this point many people still regard the BGA with suspicion, rather than considering other options.
With the above in mind, my recommendation for x-ray inspection of BGAs is as follows:
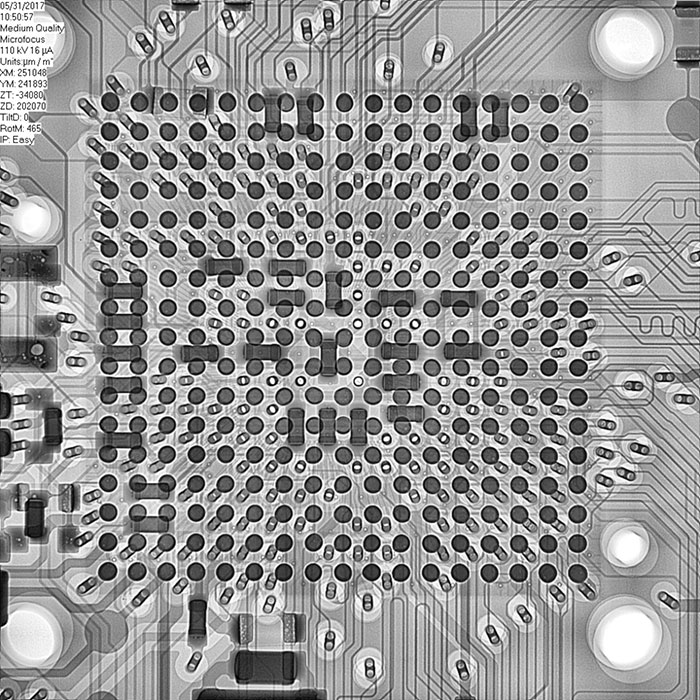
- Take a low magnification view of the whole BGA from top down. This will clearly identify any obvious shorts, missing balls and very large voids (FIGURE 1).
- Take an oblique angle view at a similar magnification. This will indicate if solder has perhaps escaped down vias.
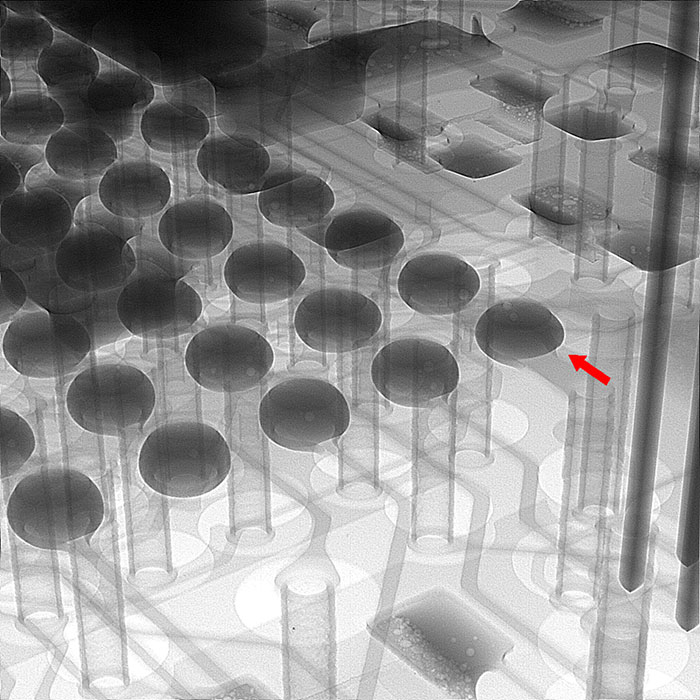
- Increase the magnification while staying at the oblique angle to views of a subset of the BGA balls. The level of magnification required will depend on having sufficient pixels in the image to cover each joint, so that variations, if they occur, can stand out. Use of image enhancement filters at this time, if available on the x-ray system, can really help the interfaces on the joints to stand out, again making any differences across different joints easier to see (FIGURE 2).
- It may be necessary to view the same region at a variety of different angles. This is because the trace layout relative to the joint will vary under the BGA, and may cause apparent joint shape anomalies, which could be misinterpreted as faults (FIGURE 3).
- If all looks good and consistent, then image other regions of the BGA in the same manner. Be sure to look at joints in the center, as well as joints at the edge of the BGA, as warpage of device and/or board, or popcorning of moisture-sensitive devices, can cause different effects in different locations.
- Finally, if everything under the BGA looks clear and consistent, but the board still does not work, start to look to other areas. Remember, the signal to the BGA comes from somewhere else. For example, check that connector at the edge of the board. Many times I have seen this is the “cause of the BGA problem!”

Figure 1. Low magnification x-ray image of an entire BGA. (Yxlon International)

Figure 2. Higher magnification x-ray image of a section of the BGA viewed at an oblique angle. (Yxlon International)

Figure 3. Oblique angle view of BGA showing a joint shape variation but caused by track shape variation, rather than by a fault. (Yxlon International)
BGAs appear to have a bad reputation, which perhaps they don’t really deserve. The size of the balls and quantity of paste typically used means that during reflow there is a lot of self-alignment and self-correction. Faults can occur, however, and x-ray inspection should be able to confirm the majority. But when all looks good and consistent in the x-ray images, and this can clearly be shown to customers to validate the quality of the overall reflow, then, to paraphrase John Lennon, “Give BGAs a chance.” If all appears okay, consider what else might be causing the problem.
, is an expert in use and analysis of 2D and 3D (CT) x-ray inspection techniques for electronics; dbc@bernard.abel.co.uk.


