BGA Voiding: What’s Important?

A practical approach for BGA void analysis.
The presence of voids within BGA joints is of widespread concern. I have heard various opinions about the effects. Often, these statements have been contradictory but well-meaning. For example, some say, “A little voiding in the joint is a good thing, as it allows for stress relaxation in the joint.” Or, “All voiding is bad, as it provides a starter mechanism for the joint to fail!”
There is also the issue of where voids are located within the joint. Are they at the device interface, the board interface, or in the bulk of the ball? Again, opinions vary as to which of these locations is of greater concern for joint reliability. Unfortunately, the available evidence to answer these fundamental questions appears to be limited, in part because it is difficult to deliberately make large voids in joints for the purposes of experimentation. Several experts in our field have tried to do this, without great success. Perhaps it shows that if you know what you are doing, then trying deliberately to do it wrong is not the place to start!
Coming from the x-ray side, I cannot really comment on the mechanics and metallurgy of BGA joint (un)reliability caused by voiding. With x-ray inspection being the only quick, nondestructive inspection technique to see the voids, however, I can comment on the practical issues surrounding void inspection and analysis and what might be considered in operational terms. IPC-A-610 guidelines suggest a pass/fail criterion of 25% for voiding levels in BGAs. There has been debate about whether this should indeed be a pass/fail value or just a process indicator, and should/could this “limit” be higher, particularly for balls located in the center of the device rather than for those at the edge. Whatever values may be appropriate, published guidelines and suggested limits end up as manufacturing standards that have to be met, and that means having the capability to measure them (and to potentially prove to a customer that you meet the requirements).
But what is 25% voiding? Typically, when x-ray inspecting for voids in BGAs, the device is looked at from the top down. Therefore, although the ball and the void(s) are 3D objects, a 2D representation of them both is observed. The void calculation, provided as an automated function on many x-ray systems, is a ratio of the total area of the voiding seen in each ball (the lighter pixels within the ball) and the total area of the ball (defined by the dark edge of the ball). This means that to exceed 25%, a single void, or the addition of the areas from several smaller voids is, in reality, quite large, and works out to be equivalent to a single void with a diameter that is half the diameter of the ball (FIGURE 1).

Figure 1. 25% voiding in a BGA ball shown as either a single void or the sum of several smaller voids.
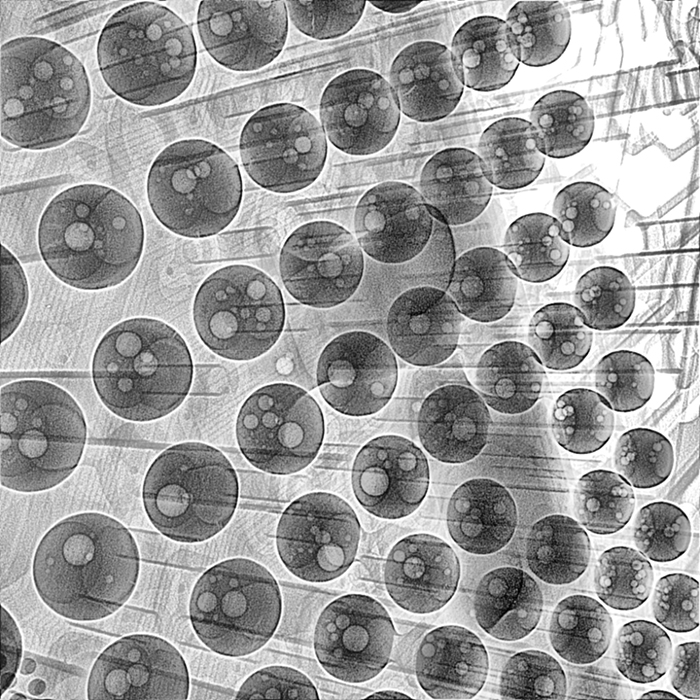
FIGURE 2 shows an x-ray of a BGA with joints with considerably larger voiding than 25%. In these cases, the very large voids have also increased the diameter of the balls, as the voids have pushed out the solder surrounding them. I would argue that seeing this quickly indicates an issue: you don’t need to know the exact void calculations!

Figure 2. BGA with very large voids.
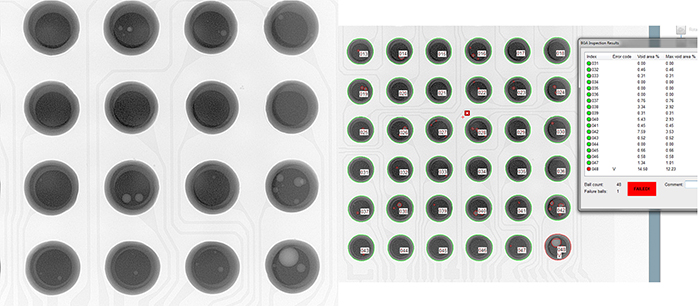
However, when using the automated void calculation on an x-ray system, the magnification of the image must be considered. If the magnification is low, then each BGA ball contains only a relatively few pixels in the image. As the void calculation counts the light and dark pixels to calculate the void area, having only a few pixels means the calculation precision will be poor. Increasing the magnification to provide more pixels for a better calculation will mean that many more views of the same BGA will be required to cover all the balls, adding time for the analysis. Therefore, I suggest that a more practical approach for BGA void analysis is to have an operator look at the BGA at a low magnification first. With simple training using similar images to Figures 1, 2 and 3, they will quickly identify what is obviously unsatisfactory and what is obviously OK. The BGA calculation can then be used more productively to check in the relatively small number of occasions when the voiding may be close to the accepted limit, and the operator is uncertain.

Figure 3. X-ray image of section of BGA with voids and an automated BGA void calculation. The ball at the bottom right has been calculated to have voiding of less than 15% but is highlighted in the data by setting a lower alarm threshold.
Oblique angle x-ray views of the balls can then be used to identify where the voids are located in the joint (FIGURE 4). So, I suggest measuring the BGA voids only when needed and have a selection of typical images that can be used to confirm or explain that voiding is within the accepted limits.

Figure 4. Oblique view x-ray image of a BGA where the position of the voids with respect to the joint interfaces can be considered.
Some guidelines also indicate that voiding at the interface should be measured. From a practical point of view of x-ray, this is more difficult to calculate simply.
Looking at an oblique view, therefore, together with the voiding calculation, will often allow an appropriate understanding of the situation to satisfy manufacturing guidelines.
Au: All images courtesy Peter Koch, Yxlon International.
, is an expert in use and analysis of 2D and 3D (CT) x-ray inspection techniques for electronics; dbc@bernard.abel.co.uk. His column appears monthly.


